Tuesday 31 July, 2007

Samsung Cameras unveils quality convergence with the i85


30 July 2007 - Samsung Cameras is pleased to announce the release of the 8.1 mega pixel i85. The i85 is equipped with a 3.0” touch screen LCD, an integrated MP3 player and PMP (Portable Multimedia Player) function. An inbuilt Tour Guide function provides instant access to travel information covering 2,600 regions in 30 countries, so you’ll always know where the action is. Further information can also be downloaded directly from the internet, and with 450 MB of internal memory you won’t need to worry about space for favourite travel tips. The camera is equipped with the Samsung Advanced Shake Reduction (ASR) system and ISO 1600 high sensitivity support so that images remain crisp and detailed even without a flash.

The i85 also features Samsung’s Intelligent Face Recognition Technology, which detects the subject’s face, automatically adjusts auto focus and auto exposure to ensure better composition and image quality in portraits. The AF function instantaneously recognises the faces of subjects and accurately focuses on them before the AE function takes over, setting the appropriate exposure to ensure the highest image quality.


The stunning new Samsung i85 is a must-have camera packed with intelligently integrated multimedia features. The i85 will retail at £229 and will be available from leading high street and online retailers from the end of August 2007. Customers requiring further information should call 00 800 122 637 27 or visit www.samsungcamera.co.uk


Samsung i85 specifications

Sensor

• 1/2.5" Type CCD
• 8.4 million pixels total
• 8.1 million effective pixels

Image sizes • 3264x2448
• 3264x2176
• 3264x1836
• 2592x1944
• 2048x1536
• 1024x768
Movie clips

• 800x592 @ 20fps
• 640x480 @ 30/15 fps
• 320x240 @ 30/15 fps
• 5X Optical Zoom
• Movie Stabilizer (User Selectable)
• Movie Editing: Pause during recording, Still Image Capture,Time Trimming

File formats • JPEG Exif v2.2
• AVI (MPEG-4)
Lens • 5x optical zoom
• 36 - 180 mm (35 mm equiv)
• F3.5 - F4.9
Image stabilization ASR (Advanced Shake Reduction)
Conversion lenses No
Digital zoom up to 5x
Focus modes

• TTL Autofocus
• Macro
• Super Macro
• Auto Macro

Focus distance • Normal: 80 cm - ∞
• Macro: 5 cm - 80 cm (wide), 30 cm -80 cm (tele)
• Super Macro (wide) : 1 cm - 5 cm
• Auto Macro: 5 cm - ∞
AF area modes • Multi AF
• Center AF
• Face Recognition AF
Metering • Multi
• Spot
• Center Weighted
• Face Recognition
ISO sensitivity • Auto
• ISO 80
• ISO 100
• ISO 200
• ISO 400
• ISO 800
• ISO 1600
Exposure compensation +/- 2EV in 1/3EV steps
Exposure bracketing Yes (unspecified)
Shuttter speed Up to 1/1000 sec (Large iris), 1/2000 sec (Small iris)
Modes

Auto, Program, ASR, Scene

Scene modes

Night, Portrait, Children, Landscape, Text, Close-up, Sunset, Dawn, Backlight, Fireworks, Beach & Snow, Self shot, Café, Food

White balance

• Auto
• Daylight
• Cloudy
• Fluorescent H
• Fluorescent L
• Tungsten
• Custom

White balance fine tune No
Self timer 2 or 10sec, Double self-timer
Continuous shooting Full-Resolution: 3 frames/sec or 2 frames/sec max. 7 images (Standard mode), Max. 5 images (Fine Mode)
Image parameters

• Color Effect : Normal, BW, Sepia, Red, Blue, Green, Negative, Custom Color, Color Mask
• Image Adjust : Saturation, Sharpness
• Fun : Cartoon, Photo Frame, High Light, Composite

Image editing

• Image Edit : Resize, Rotate, Trimming
• Color Effect : Normal, BW, Sepia, Red, Blue, Green, Negative, Custom Color Color Filter, Color Filter
• Image Adjust : Brightness, Contrast, Add Noise, Saturation, Red Eye Fix
• Fun : Cartoon, Photo Frame, High Light, Composite, Sticker

Flash

• Auto
• Auto & Red-eye reduction
• Fill-in flash
• Slow sync
• Flash off
• Red eye fix
• Range: Up to 4.0 m (wide), up to 2.85 m (tele)

Viewfinder No
LCD monitor • 3.0" TFT LCD
• 230,000 pixel
Connectivity • DC in
• AV out (NTSC/PAL)
• USB 2.0
Print compliance • EXIF 2.2
• PictBridge 1.0
• DPOF 1.1
Storage • SD/SDHC/MMC card
• Internal memory (173MB available to user)
Power • Li-ion battery pack (SLB-1137D: 3.7V, 1100mAh)
• Optional AC adapter
Other functions MP3 playback
PMP (Portable Media Player)
World Tour Guide
Text Viewer
Storage Driver
Voice Recorder
Weight (no batt) TBC
Dimensions 95 x 61.5 x 20.2 mm (3.7 x 2.4 x 0.8 in)

Thursday 12 July, 2007

Using Water to Lighten Landscape Photos

Most Pro landscape photographers recommend shooting either at (or around) dawn or dusk in order to capture their scene in the ‘golden hours’ when the light is at it’s best (in fact some will rarely shoot at any other time of day).

However, one of the problems associated with shooting at this time of day is that while the sky will often have enough light in it the foreground of your images can sometimes end up being a little underexposed and featureless.

One way to get around underexposed foregrounds is to include water in that area of your shot and to get it reflecting light from the sky.

This is a particularly effective technique at sunrise or sunset when there’s color and interesting cloud formations in the sky (and reflections in the water).

It may take a little experimentation with different positions to shoot from in order to get the right part of the sky in the reflections but with a little trial and error the effect can be quite stunning and a much brighter and more balanced image.

Even if you don’t get perfect reflections the light coming from the water can help balance the shot and help you overcome underexposed foregrounds.


Here are some sample photos:


Courtesy: Digital-Photography-School

Thursday 5 July, 2007

How to Photograph Fireworks Displays

How to Photograph Fireworks Displays

Do you want to know how to photograph fireworks? Below I’ll give you 10 tips to help you get started.

Fireworks Displays are something that evoke a lot of emotion in people as they are not only beautiful and spectacular to watch but they also are often used to celebrate momentous occasions.

I’ve had many emails from readers asking how to photograph fireworks displays, quite a few of whom have expressed concern that they might just be too hard to really photograph. My response is always the same - ‘give it a go - you might be surprised at what you end up with’.

My reason for this advice is that back when I bought my first ever SLR (a film one) one of the first things I photographed was fireworks and I was amazed by how easy it was and how spectacular the results were. I think it’s even easier with a digital camera as you can get immediate feedback as to whether the shots you’ve taken are good or not and then make adjustments.

Of course it’s not just a matter of going out finding a fireworks display - there are, as usual, things you can do to improve your results.

1. Use a Tripod
Perhaps the most important tip is to secure your digital camera to something that will ensure it doesn’t move during the taking of your shots. This is especially important in photographing fireworks simply because you’ll be using longer shutter speeds which will not only capture the movement of the fireworks but any movement of the camera itself. The best way to keep your camera still is with a tripod. Alternatively - keep in mind that there are other non Tripod options for beating camera shake.

2. Remote Release

One way to ensure your camera is completely still during fireworks shots is to invest in a remote release device. These will vary from camera to camera but most have some sort of accessory made for them. The other way of taking shots without touching your camera is to use the self timer. This can work but you really need to be able to anticipate shots well and its very very hit and miss (read more on remote shutter releases).

3. Framing Your Shot

One of the most difficult parts of photographing fireworks is working out where to aim your camera. The challenge you’ll face in doing this is that you generally need to aim your camera before the fireworks that you’ll be photographing goes off - anticipation is key. Here are a few points on getting your framing right.


  • Scope out the location early - Planning is important with fireworks and getting to the location early in order to get a good, unobstructed position is important. Think about what is in the foreground and background of your shots and make sure you won’t have people’s heads bobbing up into your shots (also consider what impact you’ll have on others around you also). Take note of where fireworks are being set up and what parts of the sky they are likely to be shot into - you might also want to try to ask some of those setting up the display for a little information on what they are planning. Also consider what focal lengths you might want to use and choose appropriate lenses at this time (rather than in the middle of the show).
  • Watch your Horizons - One thing that you should always consider when lining up fireworks shots is whether your camera is even or straight in it’s framing. This is especially important if you’re going to shooting with a wide focal length and will get other background elements in your shots (ie a cityscape). Keeping horizons straight is something we covered previously on this site and is important in fireworks shots also. As you get your camera on your tripod make sure it’s level right from the time you set up.
  • Vertical or Horizontal? - There are two main ways of framing shots in all types of photography, vertically (portrait) or horizontally (landscape). Both can work in fireworks photography but I personally find a vertical perspective is better - particularly as there is a lot of vertical motion in fireworks. Horizontal shots can work if you’re going for more of a landscape shot with a wider focal length of if you’re wanting to capture multiple bursts of fireworks in the one shot - but I don’t tend to go there that often.
  • Remember your framing - I find that when I photograph fireworks that I spend less time looking in my viewfinder and more looking at the sky directly. As a result it’s important to remember what framing you have and to watch that segment of the sky. Doing this will also help you to anticipate the right time for a shot as you’ll see the light trails of unexploded rockets shooting into the sky.
4. Focal Length?
One of the hardest parts of photographing fireworks is having your camera trained on the right part of the sky at the right time. This is especially difficult if you’re shooting with a longer focal length and are trying to take more tightly cropped shots. I generally shoot at a wider focal length than a tight one but during a show will try a few tighter shots (I usually use a zoom lens to give me this option) to see if I can get lucky with them. Of course zoomed in shots like the one to the left can be quite effective also. They enable you to really fill the frame with great color. Keep in mind however that cropping of your wider angle fireworks shots can always be done later to get a similar impact in your photography.

5. Aperture

A common question around photographing fireworks displays is what aperture to use. Many people think you need a fast lens to get them but in reality it’s quite the opposite as the light that the fireworks emit is quite bright. I find that apertures in the mid to small range tend to work reasonably well and would usually shoot somewhere between f/8 to f/16.

6. Shutter Speed

Probably more important to get right than aperture is shutter speed. Fireworks move and as a result the best photographs of them capture this movement meaning you need a nice long exposure. The technique that I developed when I first photographed fireworks was to shoot in ‘bulb’ mode. This is a mode that allows you to keep the shutter open for as long as you hold down the shutter (preferably using a remote shutter release of some type). Using this technique you hit the shutter as the firework is about to explode and hold it down until it’s finished exploding (generally a few seconds).

You can also experiment with set shutter speeds to see what impact it will have but I find that unless you’re holding the shutter open for very long exposures that the bulb technique works pretty well.

Don’t keep your shutter open too long. The temptation is to think that because it’s dark that you can leave it open as long as you like. The problem with this is that fireworks are bright and it doesn’t take too much to over expose them, especially if your shutter is open for multiple bursts in the one area of the sky. By all means experiment with multiple burst shots - but most people end up finding that the simpler one burst shots can be best.

7. ISO

Shooting at a low ISO is preferable to ensure the cleanest shots possible. Stick to ISO 100 and you should be fine.

8. Switch off your Flash

Shooting with a flash will have no impact upon your shots except to trick your camera into thinking it needs a short exposure time. Keep in mind that your camera’s flash will only have a reach of a few meters and in the case of fireworks even if they were this close a flash wouldn’t really have anything to light except for some smoke which would distract from the real action (the flashing lights).Switch your flash off.

9. Shoot in Manual Mode

I find I get the best results when shooting in manual exposure and manual focus modes. Auto focusing in low light can be very difficult for many cameras and you’ll end up missing a lot of shots. Once your focusing is set you’ll find you don’t really need to change it during the fireworks display - especially if you’re using a small aperture which increases depth of field. Keep in mind that changing focal lengths will mean you need to need to adjust your focusing on most lenses.

10. Experiment and Track Results

Throughout the fireworks display periodically check your results. I generally will take a few shots at the start and do a quick check to see that they are OK before shooting any more. Don’t check after every shot once you’ve got things set up OK (or you’ll miss the action) but do monitor yours shots occasionally to ensure you’re not taking a completely bad batch.

Also experiment with taking shots that include a wider perspective, silhouettes and people around you watching the display. Having your camera pointed at the sky can get you some wonderful shots but sometimes if you look for different perspectives you can get a few shots that are a little less cliche and just as spectacular. Most of the best shots that I’ve seen in the researching of this article have included some other element than the fireworks themselves - whether it be people, buildings, landmarks or wider cityscape perspectives.

More Tips from DPS Readers
  • “Find Out the Direction of the Wind - You want to shoot up wind, so it goes Camera, Fireworks, Smoke. Otherwise they’ll come out REALLY hazy.”
  • “Also, I find that if you shoot from a little further back and with a little more lens, you can set the lens to manual focus, focus it at infinity and not have to worry about it after that.”
  • “Remember to take advantage of a zero processing costs and take as many pictures as possible (more than you’d normally think necessary). That way, you’ll up your chances of getting that “perfect” shot.”
  • “Make sure you are ready to take pictures of the first fireworks. If there isn’t much wind, you are going to end up with a lot of smoke in your shot. The first explosions are usually the sharpest one.”
  • “Get some black foam core and set your camera to bulb. Start the exposure when the fireworks start with the piece of foam core in front of the lens. Every time a burst happens move the foam core out of the way. You will get multiple firework bursts in one exposure”
  • “Another tip I would add to this is pre-focus if possible (need to be able to manually focus or lock down focus for good) before the show starts so other elements in the frame are sharp They did mention that you only need to focus once but its a lot easier to take a few shots before the show starts and check them carefully rather than wait until the show has begun and you are fiddling with focus instead of watching fireworks!”

What are histograms in Digital Cameras

“I was flicking through my camera’s menu today and came across a little graph labeled ‘histogram’. What is it and should I take any notice of it? Is there such a thing as the ideal histogram? What should we be aiming for?” - Brent


What is a Histogram

Histograms are a topic that we could (and probably should) spend a lot of time talking about but let me give you a very brief answer to get you through in the short term.

Histograms are a very useful tool that many cameras offer their users to help them get a quick summary of the tonal range present in any given image.

It graphs the tones in your image from black (on the left) to white (on the right).

The higher the graph at any given point the more pixels of that tone that are present in an image.

So a histogram with lots of dark pixels will be skewed to the left and one with lots of lighter tones will be skewed to the right.

The beauty of a histogram is that the small LCD display on your camera is not really big enough to give you an great review of a picture and you can often get home to find that you’ve over or under exposed an image. Checking the histogram can tell you this while you’re in a position to be able to adjust your settings and take another shot.

Some Examples of Histograms

Let’s look at a couple of examples of histograms on shots:

Compare these two shots and their corresponding histograms:


The above shot has a lot of light tones - in fact there are parts of the shot that are quite blown out. As a result on the right hand side of the histogram you can see a sudden rise. While there are quite a few mid tones - everything is skewed right and with the extreme values on the right hand side indicate an over exposed shot.


This second shot has a lot of dark tones. This is partly because of the black and navy clothes in the shot - but also because it’s slightly underexposed shot. The resulting histogram is quite different to the first one - the values are skewed to the left hand side.

Is there such a thing as a ‘good’ histogram?

As with most aspects of photography, beauty is the in eye of the beholder and there’s always a lot of room for personal taste and different ways of expressing yourself as a photographer.

There is no such thing as the ‘perfect’ histogram - different subjects and photographic styles will produce different results. For example taking a silhouette shot might produce a histogram with peaks at both ends of the spectrum and nothing much in the middle of the graph. Taking a shot of someone at the snow will obviously have a histogram with significant peaks on the right hand side…. etc

Having said this (and to generalize) - in most cases you’ll probably want a fairly balanced shot with a nice spread of tones. Most well exposed shots tend to peak somewhere in the middle and taper off towards the edges.

Using Histograms While Shooting

So now you know what a histogram is - grab your digital camera’s manual and work out how to switch it on in playback mode. This will enable you to see both the picture and the histogram when reviewing shots after taking them.

Keep an eye out for histograms with dramatic spikes to the extreme ends of either side of the spectrum. This indicates that you have a lot of pixels that are either pure black or pure white. While this might be what you’re after remember that those sections of the image probably have very little detail - this is a hint that your image could be either over or under exposed.

The histogram is really just a tool to give you more information about an image and to help you get the effect that you want. Having your camera set to show you histograms during the view process will tell you how your image is exposed. Learning to read them will help you to work out whether you’re exposing a shot as you had hoped.

Another Example of a Histogram

Lets finish this tutorial by looking at one last example of a histogram:


You can see in this shot a much more even spread of tones. It’s still not perfect and I’d do a little post production work but it’s a much more evenly exposed shot and the histogram reflects this.

The whole tutorial and illustrations has been copied from here.

HP Photosmart R937 Digital Camera

Overview
The HP Photosmart R937 Digital Camera takes photos to the next level with a large, 3.6-inch interactive touchscreen and superior 8-megapixel resolution. Ideal for those on the go – this stylish, remarkably thin camera easily slips into a pocket or purse. Users can apply creative touches, easily organize photos with Microsoft Vista™-compatible tags, add e-mail addresses for easy sharing and create slide shows – all in the camera. In addition, the HP Photosmart R937 Digital Camera includes the latest HP Design Gallery features such as industry-leading in-camera red-eye removal,(1) pet-eye fix, slimming, HP steady photo anti-shake and HP touch-up to ensure subjects look their best.

Key Features and Benefits
• Take superior photos that can be cropped or enlarged with 8-megapixel resolution and Fujinon 3x optical zoom.
• View photos easily – indoors or out, using an energy-efficient 3.6-inch Auto-bright Display.
• Edit and organize photos directly from the easy-to-use, interactive touchscreen – no PC needed.
• Enjoy quick photo organization for easy sharing using the in-camera, Microsoft Vista™-compatible tagging feature and touchscreen menus.
• Easily add e-mail addresses or tags to the camera simply by tapping the virtual keyboard.
• Get the photo intended with HP Design Gallery’s industry-leading in-camera red-eye removal(1) and pet-eye fix.
• Slim subjects and remove blemishes – in camera – with a unique slimming feature and HP touch-up.
• Add on-camera personal touches to photos using borders, colors and effects.
• Get more detailed photos with new automatic HP steady photo anti-shake mode and HP adaptive lighting technology.
• Stitch panoramic photos and save them for viewing and easy printing – no PC necessary.
• Catch gripping action shots with minimal delay with the easy-to-use burst mode.
• Capture spontaneous memories in high-quality video with audio.
• Snap a photo and mark it for e-mail right on the display, using HP Photosmart Share.
• Includes everything needed to start taking photos right out of the box, including a long-lasting, rechargeable battery and 32 MB of internal memory.
• Effortlessly share, save and print photos, plus order prints online, using HP Photosmart
Express.
• Order brilliant prints online through Snapfish by connecting to a PC.(2)
• Microsoft Windows Vista™ ready.

Additional Features
• Meets HP’s General Specification for the Environment, which includes compliance with the EU ROHS Directive (focus: lead, cadmium, mercury, PBB, PBDE).(3)
• Spend more time shooting and sharing photos by quickly charging the HP Photosmart R937 Digital Camera’s high-capacity, lithium-ion battery in one hour or less(5) with the optional HP Photosmart Quick Recharge Kit for R-series cameras.(4)
Technical Specifications
• 8-megapixel resolution
• 3x optical, 8x digital zoom
• Dimensions/Weight
o 4.12 inches (w) x 1.06 inches (d) x 2.86 inches (h)
o 0.4 lbs. without battery
• PictBridge support
• JPEG (Exif 2.2)
• Support/Connectivity
o USB Connectivity
o USB-compatible PC with Windows Vista, 2000, XP Home, XP Professional, XP Professional x64
o USB-compatible Macintosh computer with Mac OS X v10.3.9, 10.4 and later
• HP offers a comprehensive support package for the HP Photosmart R937 Digital Camera that includes one-year of phone support as well as real-time chat and email support beyond the warranty as part of its HP Total Care portfolio of services. For more information regarding HP Total Care, including related terms and charges, please go to www.hp.com/support.

Pricing and Availability
Estimated U.S. street price is $299.99.(6)
Expected to be available for purchase August 2007 in North America.

Read this full specification at http://www.hp.com/hpinfo/newsroom/press_kits/2007/digphoto/fs_r937.pdf

More review about this camera at:
http://www.dpreview.com/news/0706/07062202hpsummer.asp

Tuesday 12 June, 2007

Kodak bolsters camera range with six new models

Tuesday, 12 June 2007


Kodak has today announced six new digital cameras to be made available between now and September, four of them marking the debut of its new 'M-Series'. The M753 and M853 are 3x zoom models with 7 and 8 megapixels respectively. The M873 and M883 meanwhile both sport 8 megapixels, a large 3-inch LCD and all-metal construction with the M883 adding face-detection to the specs list. Also on the way are the Z1275 - a 12MP 5X zoom with 'photographically-advanced features' and the 7-megapixel ZD710 superzoom with 10X lens.


Introducing Four Thin, Stylish, Affordable and Feature-Packed Cameras and Two High Zoom Z-Series Cameras
LONDON , June 12, 2007 — Eastman Kodak Company today announced the global launch of a new sleek line of zoom digital cameras for the style-savvy consumer. The KODAK EASYSHARE M-Series consists of four fashionable cameras, the M753, M853, M873 and M883, all of which are capable of capturing exceptional pictures at an attractive price. “The style / value segment has become an increasingly important category in the digital imaging market,” said Julian Baust, Chairman & Managing Director, Kodak Limited. “Our M-Series line brings consumers the opportunity to expand their picture-taking experience by converging stylish, compact designs and quality digital imaging technology, with affordable pricing.”

M753 and M853
The KODAK EASYSHARE M753 and M853 Zoom Digital Cameras are equipped with 3x optical zoom lenses and 7- and 8-megapixel resolution respectively, which allows consumers to print clear, crisp images up to 30” x 40” in size. Memories captured with the KODAK EASYSHARE M-Series Cameras are displayed on a vibrant 2.5-inch LCD screen, perfect for instantly sharing clear, bright pictures and videos whether inside or outdoors. The pocketable design of the KODAK EASYSHARE M753 and M853 is available in silver and black. The cameras are complemented by a full range of fun camera accessories designed for the fashion-conscious person.

M873 and M883
Two additional zoom digital cameras in the KODAK EASYSHARE M-Series line are the M873 and M883, both offering 8-megapixel resolution and high ISO settings. While maintaining its sleek design, the M883, with built-in face detection technology, allows consumers to view their pictures and videos on a huge 3-inch LCD screen. The all-metal bodies of the M873 and M883 are available in silver.

M-Series Features
The KODAK EASYSHARE M-Series Cameras are loaded with a vast array of features that make great picture-taking incredibly simple. From high ISO settings that produce clearer pictures in low-light situations, to Digital Image Stabilization and KODAK PERFECT TOUCH Technology, the features on board the KODAK EASYSHARE M-Series Cameras help consumers take consistently better shots.

M-Series Pricing
The KODAK EASYSHARE M753 Camera will retail for £99.99 (RRP) beginning in July 2007. The M853 and M873 will follow in August and the M883 will be available in September. The fashionable camera accessories range from £13.99 to £39.99 (RRP) and can be found on www.kodak.co.uk

Additional Cameras Introduced - Z1275 and ZD710
Also announced today, are the new KODAK EASYSHARE Z1275 and ZD710 Zoom Digital Cameras. The Z1275 is a small sized high-zoom digital camera, offering 12-megapixel imaging and 5x optical zoom with photographically-advanced features. The 7-megapixel ZD710 is a versatile, fully-automatic zoom digital camera with 10x optical zoom and high ISO. And like the M-Series cameras, both the Z1275 and ZD710 are equipped with features that help consumers take consistently better shots, like Digital Image Stabilization and KODAK PERFECT TOUCH Technology. The Z1275 and ZD710 are both available from August 2007.

About the KODAK EASYSHARE System
Kodak continues to bring groundbreaking features to its award-winning KODAK EASYSHARE Digital Photography System, enhancing the digital photography experience for consumers worldwide. The EASYSHARE System consists of digital cameras, picture frames, snapshot printers, online services, software, inkjet and thermal photo papers, and accessories—making picture-taking, sharing and archiving effortless. All KODAK EASYSHARE Products being introduced today include the latest Version 6.2 of KODAK EASYSHARE Software featuring an array of enhancements to help consumers find, create and share pictures like never before. Version 6.2 Software now includes direct access to KODAK Gallery making it simple to find albums stored online. The new KODAK EASYSHARE Software Version 6.2 can be downloaded for free. Further information on all KODAK EASYSHARE Products can be found at http://www.kodak.co.uk/

Sony Cyber-Shot DSC W5


DSC-W5 Weight: 7 oz (197 g) Body; 9 oz (253 g) Body w/Battery, Media, Wrist StrapDimensions: 3 7/12" x 2 4/11" x 1 6/13" (91 x 60 x 37.1mm)


Features:


1/1.8" 5.1 Megapixel Super HAD™ CCD : Super HAD (Hole Accumulation Diode) CCDs provide excellent image quality by allowing more light to pass to each pixel, increasing sensitivity and reducing noise.


3X Optical/2X Digital/6X Total Zoom : Optical zoom helps you fill the frame with your subject for better pictures. And Sony’s Precision Digital Zoom helps bring your subject closer with an extra 2X magnification.


0 -12.0X Smart Zoom™ Feature (at VGA Resolution): The Smart Zoom feature intelligently uses the full CCD to let you zoom into the portion of interest by cropping the image size-thus avoiding the image degradation of Digital Zooms.


Carl Zeiss® Vario-Tessar® Lens: The Vario-Tessar lens is specially produced for very compact cameras. This specialized design allows quick auto-focus, appealing zoom range while still maintaining a compact design.


Real Imaging Processor™ Technology: The innovative Real Imaging Processor in the DSC-W5 not only improves picture quality and clarity but also improves camera response time, decreases shutter lag and improves battery stamina.


2.5" LCD Monitor: The extra-large high-resolution 115K LCD Monitor makes framing shots and reviewing pictures easy.


Live Histogram Display: Available in capture and playback the Live Histogram Displays the concentration of pixels at each luminosity value making it easy to evaluate correct exposure.


14-Bit DXP A/D Conversion: Sony's 14-bit Digital EXtended Processor captures the range between highlight and shadow with up to 16,384 values, for extended dynamic contrast and detail.


5 Area Multi-Point Auto Focus: By evaluating 5 separate focus areas of the frame, Sony's Multi-Point AF system can intelligently focus on the subject and avoid mistakenly focusing on the background.


Manual Exposure Mode: Manual Exposure Mode provides extended control with 46-step adjustable Shutter speed (30-1/1000 sec.), and 2-step Aperture control.


AF (Auto Focus) Illuminator: Briefly illuminating the subject, in low-or no-light conditions, the AF Illuminator helps establish a positive focus lock.


Selectable Focus Mode: Monitoring AF (Auto Focus) helps you anticipate the action by focusing even before you press the shutter release.


Multi-Pattern Measuring: Independently light-metering 49 points of the frame, Multi-Pattern Measuring establishes the optimum exposure, even when highlight and shadow isn't centered in the frame.


Scene Selection Mode: With 7 Scene Modes, parameters can be matched to the shooting conditions. Choose from one of the following: Twilight, Twilight Portrait, Soft Snap, Landscape, Beach, Snow, Candle.


Pre-Flash Metering: With a momentary pre-flash, the camera illuminates the subject and sets exposure through the lens for accurate flash metering. Adjustable flash level and red-eye reduction ensure great flash shots.


Slow Shutter Noise Reduction: During long exposures, Slow Shutter NR captures the scene, and then the CCD noise pattern with a dark frame exposure. By subtracting the two, even long exposures can be clear.


Memory Stick® Media and Memory Stick: Digital. Powerful. Transportable.™Memory Stick® media is compact, portable and rugged:connecting a variety of hardware and software applications.


32MB Internal Memory1 Included: Shoot without a flash memory card with 32 MB internal memory1; Slot for optional Memory Stick®, Memory Stick PRO™ media. Full 32MB of internal memory can be copied to optional Memory Stick media.


9 Shot Burst Mode: Capture up to nine 5MP shots (fine) or 100 shots VGA (standard) at 0.7 frame/sec. Perfect for high speed subjects or fast moving action such as sports or small children.


Multi-Burst Mode: Captures 16 320x240 frames as part of a single 1280x960 image which plays back sequentially in the camera. Selectable 1/7.5, 1/15, 1/30 second.


MPEG Movie VX Standard/Fine Mode: Captures VGA (640x480) high frame rate (up to 30 frames per second) audio/video clips with length limited only by the capacity of the media. Video mail mode captures smaller file sizes suitable for email.


Conversion Lens Compatible: With VAD-WA adaptor, you can add tele- or wide- conversion lenses for greater magnification or wider field of view, as well as protective and special effect filters.


PictBridge™ Compatibility: Connect to any PictBridge™ compatible printer with the supplied USB cable and print directly from the camera. Images can be viewed and selected for printing right on the camera's LCD, with menus for print quantity, date and index print.


Rechargeable AA NiMH Batteries: The high capacity 2100 mAh AA NiMH batteries provide reliable, long-lasting power for continuous shooting. The supplied BC-CS2 charger provides a convenient way to charge the batteries.


Supports High Speed USB 2.02:


Clear Color/Clear Luminance NR:


3:2 Aspect Ratio Mode:


Adjustable Color Saturation/Contrast:


Audio/Video Output:


MPEG1 Cue, Review and Divide:


Specifications:


Convenience
White Balance: Automatic, Cloudy, Daylight, Flash, Fluorescent, Incandescent
Self Timer: Yes (10 Seconds)
Memory Stick PRO™ Media Compatibility: Tested to support up to 4GB media capacity1; does not support Access Control security function
Still Image Mode(s): Burst, JPEG (Fine/Standard), Multi-Burst
Red-Eye Reduction: Yes (On/Off)
Burst Mode: 9 Shot at 0.7fps (5MP JPEG fine), 100 Shot VGA at 0.7fps (JPEG std.)
Erase/Protect: Yes
Date/Time Stamp: Yes
Media/Battery Indicator: Yes


General
Imaging Device: 1/1.8" Super HAD™ CCD
Recording Media: 32MB1 internal Flash Memory, Memory Stick® Media, Memory Stick PRO™ Media, Memory Stick Duo™ Media (with adaptor), Memory Stick PRO Duo™ Media (with adaptor)
Megapixel: 5.1 MP


Hardware
Microphone/Speaker: Yes/Yes
LCD: 2.5" (115K Pixels TFT LCD Screen)
Lens Construction: 7 Elements in 5 Groups, 3 Aspheric Elements
Viewfinder: Optical, True Zoom
Lens Type: Carl Zeiss® Vario-Tessar®
Docking Station: N/A


Inputs and Outputs
USB Port(s): Yes (Supports USB 2.02)
Accessory Terminal: Mini-Jack
Input(s): N/A
Audio/Video Output(s): Yes (NTSC/PAL Selectable)


Operating Conditions
Flash Effective Range: 1"-14'9" (0.3-4.5 m)
Flash Mode(s): Auto, Forced, Off, Slow SynchroOptics/Lens
Focal Length: 7.9-23.7mm
35mm Equivalent: 38-114mm
Aperture: f2.8-f5.2 (W), f5.2-f10 (T)
Focus: 5 Area Multi-Point AF, Center AF, 5-Step Manual
Focal Distance: 2 3/8" (6cm) (Minimum Macro W), 11 7/8" (30cm) (Minimum Macro T)
Aperture Range: f2.8-5.6(W), f5.2-10 (T)
Shutter Speed: 1/8-1/2000 sec. (Auto), 1-1/2000 sec. (Program Auto) , 30-1/1000 sec. (Manual)
Exposure Compensation: ±2.0 EV, 1/3 EV Steps
ISO: Auto, 100, 200, 400
Filter Diameter: 30mm (by required VAD-WA adaptor)
Smart Zoom® Technology: 0-12X (at VGA Resolution)
Digital Zoom: 0-2.0X (Precision)
Optical Zoom: 3X
Macro Mode: 2 3/8" (6cm)
Total Zoom: 6X


Power
Battery Type: "AA" NiMH, "AA" Alkaline, "AA" Nickel-Metal Manganese
Battery Capacity: N/A


Service and Warranty Information
Limited Warranty: 1 Year Parts & Labor


Software
Supplied Software: Picture Package™ for Sony v1.6 (Windows®), Pixela™ ImageMixer VCD2 (Macintosh®), USB Driver, Cyber-shot Life tutorial (Windows®)
Operating System Compatibility: Microsoft® Windows® 98, 98SE, 2000 Professional, Me, XP Home and Professional; Macintosh® OS 9.1/9.2/OS X (10.0 - 10.3)


Video
Hybrid Record Mode: N/A


Convenience Features
Movie Mode(s): MPEG VX Fine with Audio (640 x 480 at 30fps) (MPEG VX Fine requires Memory Stick PRO media), MPEG VX Standard with Audio (640 x 480 at 16fps), Video Mail with Audio (160 x 112 at 8fps)
Power Save Mode: Yes (after approx. 3 min. of inactivity)
Picture Effect(s): Black & White, Sepia
Scene Mode(s): Beach, Candle, Landscape, Snow, Soft Snap, Twilight, Twilight Portrait
Histogram Display: Yes
Real Imaging Processor™ Technology: Yes
AF Illuminator Light: Yes
PictBridge Compatible: Yes
Clear Color/Clear Luminance NR: Yes
Multi-Pattern Measuring: Yes
SteadyShot® Image Stabilization: N/A
NightShot® Infrared System: N/A
NightFraming System: N/A


Accessories:


Supplied Accessories:


Rechargeable AA Batteries (NH-AA-DA)


Battery Charger and Cord (BC-CS2)


A/V and USB Cables


Wrist Strap


Software CD-ROM


Optional Accessories:


Starter Kit (ACC-CN3TR)


Rechargeable NiMH Batteries (2pk)(NH-AA-2DB)


Soft Leather Carrying Case (LCS-WB)


Soft Textile Carrying Case (LCS-WD)


Conversion Lens Adaptor Mount (VAD-WA)


Wide Angle Conversion Lens4(VCL-DH0730)


Super Telephoto Conversion Lens4(VCL-DH2630)


Telephoto Conversion Lens4 (VCL-DH1730)


Polarizing Kit Filter4 (VF-30CPKS)


External Slave Flash w/Bracket (HVL-FSL1B)


Marine Sports Pak (MPK-WA)


Marine Color Filter Kit (VF-MP5K)


Memory Stick® Media (MSH-128A)


Memory Stick PRO™ Media (MSX-256S/N)


Memory Stick PRO™ Media (MSX-512S/N)


Memory Stick PRO™ Media (MSX-1GS/N)


Memory Stick PRO™ Media (MSX-2G/N)


Memory Stick PRO™ Media (MSX-4G/N)


Memory Stick PRO™ Media USB Adaptor (MSAC-US30)


Multi-slot Memory Stick Adaptor (MSAC-USM1)


Footnotes
1. Recording numbers are approximate and will vary depending upon the images. Available storage capacity of Memory Stick and Memory Stick PRO media may vary. A portion of the memory is used for data management functions. Actual available memory in MBs is:16=15, 32=30, 64=61, 128=123, 256=220, 512=460, 1GB=940MB, 2GB=1,850MB, 4GB=3.66GB. 2. Not all products with USB connectors may communicate with each other due to chipset variations. 3. Under Average Conditions: Normal Mode (JPEG), Picture quality Fine; Shooting each image at 30 second intervals; Flash operated every other shot; Power is turned on/off after every 10 shots. Actual results may vary on conditions of use. 4. VAD-WA Conversion Lens Adaptor Mount Required


©2005 Sony Electronics Inc. Reproduction in whole or in part without written permission is prohibited. All rights reserved. Sony, Cyber-shot, Digital, Powerful, Transportable, Memory Stick, the Memory Stick logo, Memory Stick PRO, Picture Package, Real Imaging Processor, Smart Zoom and Super HAD are trademarks of Sony. Carl Zeiss and Vario-Tessar are trademarks of Carl Zeiss. Microsoft and Windows are registered trademarks of Microsoft Corporation. Macintosh is a trademark of Apple Computer. PictBridge is a trademark of CIPA. All other trademarks are property of their respective owners. Features and specifications subject to change without notice. Non-metric weights and measures are approximate. All screen images simulated. Please visit the Dealer Network for more information at www.sony.com/dn


Information retreived from http://b2b.sony.com/Solutions/product/DSC-W5

Thursday 7 June, 2007

Sony Cybershot DSC-R1


A camera that changes your view. And your mind.

Preview your exposure in real time with the new alternative to consumer DSLR, the Sony® Cyber-shot® DSC-R1 camera. Its APS-sized CMOS sensor, 5X optical zoom, and Carl Zeiss® wide-angle lens allow you to focus in on your subject without losing the surrounding beauty. All with the clarity of 10.3-megapixel resolution. Never before have these digital camera technologies been integrated into one convenient package, so it's not surprising it's a Sony.

Picture quality that speaks for itself.

While technologists will marvel over the DSC-R1's APS-C class image sensor, 10.3 Megapixels of resolution and Carl Zeiss® lens, photographers will be persuaded by something else. The pictures.

The DSC-R1 takes pictures of uncanny beauty, with supple skin tones, skies of gorgeous blue and contrast so deep and rich, it pulls the viewer in.

The 10.3 megapixels your pictures deserve.

The DSC-R1 creates pictures of such abundant detail that they reward repeated viewing. Thanks to the Carl Zeiss® lens, a remarkable, short-backfocus design and Sony's 10.3 Megapixel image sensor, you'll capture the moment as never before. And your pictures will retain detail even when you crop them and enlarge them.

From deepest shadows to brightest highlights.

Shooting with the typical digital camera means constantly navigating between losing detail in "blown out" highlights and losing detail in "crushed" blacks. The DSC-R1 boasts an image sensor some 12 times the typical size.

So you get extraordinary dynamic range from the blackest blacks to the brightest white. Your pictures will pack the punch of powerful contrast, along with the grace and subtlety of highlight and shadow detail.

All the subtlety of life itself.

The DSC-R1 matches the exceptional contrast of Sony's image sensor with the gorgeous gradation of our 14-bit Digital Extended Processor (DXP). The result is photography that's remarkably free of the "banding" and "false contouring" of lesser designs. You'll appreciate the difference on skin, blue sky and subtle tones of fabrics and flowers.

The picture and nothing but the picture.

Some pictures come with an unwanted, added ingredient. In film photography, it's called grain. In digital photography, it's called noise. In either case, it's visual texture that was not present in the original scene. Sony overcomes noise with Correlated Double Sampling on the CMOS image sensor and Clear RAW Noise Reduction in post processing. The result is photography that's incredibly clear and natural.

Beyond the ordinary.


Supple, vivid and natural, pictures taken with the DSC-R1 enjoy extraordinary color rendition. That's no surprise. It's the direct result of the Carl Zeiss® lens and a host of Sony technologies: our CMOS image sensor, our Real Imaging Processor™ circuitry and our 14-bit Digital Extended Processing (DXP).

In low light shooting, the R1 shines.

A final component of picture quality is the camera's ability to capture images in low light. Sony's extra-large CMOS image sensor converts incoming light into far more electrons than the typical digital camera sensor can.

So you can capture beautiful images in candlelight and moonlight. You can freeze the action on demanding subjects like indoor sports. And you're free to shoot in more situations without the traditional low-light tools: tripods, long exposures, image stabilization or external flash!

Pro quality in the palm of your hand.

For years, digital shooters have had two choices. Choose professional picture quality -- and live with the bulk and complexity of a digital single lens reflex (D-SLR) camera. Or choose convenience -- and live with lesser quality in the world of point-and-shoot cameras.

Now there's a third way. Because now, someone has built a professional-grade image sensor into an all-in-one camera. That someone is Sony. That camera is the DSC-R1.

How Sony did it?

The extra-large image sensors of D-SLRs simply draw so much power that they can only be active at the moment of exposure, the same as film. This means the cameras incorporate a bulky mirror box and pentaprism, the same as film SLRs. Sony broke new ground in APS-class image sensors.Sony's latest Complementary Metal Oxide Semico nductor (CMOS) technology is so power-efficient that the DSC-R1 image sensor can operate continuously, whenever the camera is on!

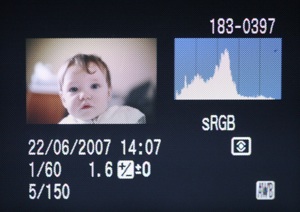
That's how the Sony DSC-R1 can do what other APS-class cameras can't. Only the R1 delivers Live Preview that lets you evaluate your exposure, white balance and histogram BEFORE you take the shot! And you'll appreciate the far and wide zoom coverage, versatile composition and compact size!

Shooting far and wide.

Because the APS-class image sensors of typical D-SLRs are smaller than a 35mm film frame, 35mm lenses undergo a focal-length conversion of about 1.5x. This is great for tele lenses, because it converts a 200 mm into a 300 mm. But on the wide end, a wide-angle 24 mm lens suddenly becomes a medium-wide 36 mm lens (35mm equivalent)! Here's where the DSC-R1 has a decided advantage. Its zoom lens starts at an ultra-wide 24 mm with 5x zoom to 120 mm (35mm equivalent). The wide end is perfect for shooting in tight spaces or capturing landscapes, panoramic views and group photos!

What's more, image sensors are notorious dust magnets. Having a built-in lens means there's no opportunity for dust to collect on Sony's CMOS sensor!

Now you can see what you're shooting.

When you frame a shot, you want to see what the camera sees. Unfortunately, the optical viewfinders of most APS-class cameras can't give you a visual preview of how the exposure will look, can't preview color reproduction and can't show you in advance how the camera will handle severe highlight or backlight shots. And many optical finders can't even show you the entire image frame!

Because the DSC-R1 incorporates a unique, APS-C class sensor that operates whenever the camera is on, the R1 can deliver continuous electronic Live Preview of the scene. So you really do see what the camera sees.

Framing and preview modes.


Sony gives you two ways to enjoy Live Preview of the scene. Framing Mode presents a bright, high-contrast picture that maximizes your ability to determine who and what is in the frame. Preview Mode not only "stops down" the lens but also adjusts the shutter to show you the effect of your exposure settings in real time.

Now you can actually see the effect of aperture, shutter speed, white balance and ISO. So you can make adjustments before you take the shot, not after! You simply can't do that with an optical viewfinder.

Shooting high and low.

Sony offers Live Preview in the eye-level through-the-lens (TTL) electronic viewfinder. Using the viewfinder can give you a more stable shooting platform, with elbows tucked in to reduce camera shake. If you need to hold the camera above or below eye level, you can frame shots in Sony's free-angle 2.0" LCD monitor. It turns and twists through a wide range, so you can hold the R1 up, position it at your waist, lower it to the floor, even point it around corners to get your shot!

Finally, a full frame viewfinder.

The optical viewfinder of the typical APS-class camera gives you a limited view of the world. Literally. These viewfinders typically show just 95% of the lens field of view. Sony's Live Preview of the scene is a better way. Because it reads the actual image straight from the same CMOS sensor that takes the picture, you always get full, 100% framing!

Better images start with a better image sensor.

The Sony® Cyber-shot® DSC-R1 camera is built around the remarkable talents of a Sony image sensor that's comparable in size to an APS-C film frame. In fact, it's more than 12 times the size of the typical digital camera sensor!

As a result, you'll experience picture quality far beyond the ordinary. And Sony's CMOS technology results in the world's first, continuously active APS-class sensor, a breakthrough that introduces a host of new capabilities to this class of camera.

Better images start with a better image sensor.

The DSC-R1 image sensor is more than 12 times the size of the typical 1/2.5-inch sensor. Other things being equal, this means twelve times the area to soak up light -- for outstanding low-light sensitivity. It also means twelve times the electrons gathered -- for superb freedom from picture noise. And it means outstanding resolution of 10.3 megapixels. At 22.5 x 14.4 mm, the sensor is comparable in size to an APS-C film frame!

The bigger picture: 10.3 amazing megapixels.

The DSC-R1 captures digital images up to 10.3 Megapixels in size. How big is a 10.3 megapixel picture? Picture this. It's almost eight times the size of a high-resolution SXGA computer screen. Now you have the freedom to crop your images -- filling the frame with your subject. Now you have the resolution for glossy magazine spreads and high-end brochures. You can even produce giant, poster-sized prints!

Seeing with CMOS technology.

The DSC-R1 represents a dramatic departure for Sony. Where all our previous digital cameras have used Sony CCDs, the R1 uses a Sony Complementary Metal Oxide Semiconductor (CMOS) image sensor. CMOS technology is ideal for the DSC-R1 because it provides much higher output speed and consumes about 90% less power than a comparable CCD.

This combination of speed and power savings enables Sony's CMOS design to accomplish something no APS-class sensor has ever done before. It operates continuously. And that makes a world of difference.

World's first continuous-use APS-class sensor.

In a film camera, the film only sees your subject for an instant, when you press the shutter. The typical APS-class image sensor is so power-hungry that it must work the same way as film, only active at the moment of exposure. Ironically, this sacrifices many of the advantages of digital shooting.

Sony's CMOS technology is a dramatic break from the past. Fast and power-efficient, the DSC-R1 image sensor can operate continuously! That's how the Sony DSC-R1 can do what other APS-class cameras can't: Live Preview of your picture's exposure, white balance and histogram!

Improving your view of the world.

When you shoot with the DSC-R1, all your pictures will benefit from the superb optical quality of a Carl Zeiss® lens with the exclusive T* (T-star) coatings. You'll also enjoy immediate, practical advantages. The DSC-R1 lens offers a remarkable combination of compact size, superb 24 mm wide angle coverage and 5x zoom to 120 mm telephoto (35mm equivalent).

The DSC-R1 can deliver these benefits because -- alone among APS-class digital cameras -- the R1 is a lens-integral design!

An integral part of the R1 system.

Logic dictates that a lens for an APS-C class image sensor should be optimized for the APS-C frame size. Unfortunately, this logic eludes most previous APS-C class digital cameras. They rely on lenses optimized for 35mm film -- lenses that are far bigger and heavier than necessary. These cameras must provide a mirror box and pentaprism, which add even more bulk.

And 35mm film lenses undergo a focal length conversion of roughly 1.5x. That's great for telephoto shots, but severely limiting for wide-angle photography. Unlike the others, the DSC-R1 lens is meticulously matched to the specific requirements of Sony's APS-C class image sensor. You get an unbeatable combination of optical performance, wide-angle coverage, zoom range, and compact size.

The legendary lenses of Carl Zeiss.

Lenses can make or break picture quality. Simply stated, your pictures can only be as good as what the lens captures. Lenses are responsible for maintaining resolution, contrast, even illumination and consistent color from the center of the picture all the way out to the corners. With so much at stake, professional photographers are notoriously finicky about the lenses they shoot with. That's why professionals love Carl Zeiss® lenses. And that's why Sony chose a Carl Zeiss lens for the DSC-R1.

Superb coverage from ultra-wide to tele.

Putting a 35mm film lens on a D-SLR with an APS-size image sensor means creating a mismatch. The lens undergoes a focal-length conversion of roughly 1.5x. This is great for tele lenses, because it converts a 200 mm into a 300 mm. But on the wide end, a wide-angle 24 mm lens suddenly becomes a medium-wide 36 mm lens (35mm equivalent)! Here's where the DSC-R1 has a decided advantage. Its zoom lens starts at an ultra-wide 24 mm with 5x zoom to 120 mm (35mm equivalent). The wide end is perfect for shooting in tight spaces or capturing landscapes, panoramic views and group photos!

Suppressing glare and flare.

A feature of top-rank Zeiss lenses, the exclusive T* (T-star) coatings control internal reflections at the glass-to-air surfaces of the lens elements. This suppresses lens "flare" or "ghosting" that can sap an image of its contrast and punch. The T* coating means 52% less reflection than a standard Carl Zeiss lens -- and a whopping 82% less reflection than a conventional lens. You get notably more natural, more vibrant images.

Superb detail, corner to corner.

The ultimate test of lens sharpness is the Modulation Transfer Function (MTF) curve -- a rigorous analysis that shows how well the lens maintains contrast and detail from the center of the image all the way out to the corner. On the vertical axis is modulation from 0% to a perfect 100%. On the horizontal axis is the distance from the image center. In these demanding tests, the DSC-R1 Carl Zeiss® lens outperforms the "standard" lens of even highly regarded D-SLRs!

Expanding your options.

To achieve even greater creative freedom with the DSC-R1, take advantage of the lens accessories that work with the 67 mm filter diameter.
  • 1.7x teleconversion lens converts the camera's 120 mm tele position to 200 mm (35mm equivalent). VCL-DEH17R, requires VAD-RA adaptor.
  • 0.8x wide angle conversion lens converts the 24 mm wide position to 19.2 mm (35mm equivalent). VCL-DEH08R, requires VAD-RA adaptor.
  • Close-up lens establishes a working distance of 9-1/2 to 13 inches. VCL-M3367.
  • Polarization filter controls reflections. VF-67CP.
  • Neutral density filter controls halation in strong sunlight. VF-67ND.
  • Multi-coated protection filter protects against scratches. VF-67MP.
The shooting options you've never had before.

From high angles to low light, from fast action to 3-minute Bulb exposures, the DSC-R1 offers shooting options unlike any previous Sony camera. And exclusive Sony advantages in the lens, image sensor and viewfinder give you capabilities that D-SLRs can't match.

Framing your shot your way.

Sony believes the camera should enable you, not hinder you. That's why the DSC-R1 lens is designed to capture an unusually wide angle -- 24 mm -- along with 5x zoom out to 120 mm (35mm equivalent). That's why Sony enables you to csompose extremely high-angle and low-angle shots, using the free-angle LCD monitor as your reference.

And that's why Sony provides a Preview Mode to show exposure, white balance and histogram BEFORE you take the shot! These are capabilities no D-SLR can match.

Flexible focus.

The DSC-R1 provides a full range of focus modes.
  • Manual Focus takes advantage of a generously knurled ring on the lens barrel. As you focus, the electronic viewfinder and LCD monitor images automatically expand, for a closer look at the fine image detail you're focusing on!
  • Single Shot AF is ideal for subjects that are standing still. The Auto Focus process doesn't begin until you press the shutter release halfway.
  • Monitor AF speeds the shot, an important advantage in sports photography. In Monitor AF, the camera is always "pre-focusing" and doesn't lock until you press the shutter release halfway.
  • Continuous AF is ideal for unpredictable subjects such as sports, pets and little kids at play. The camera continues to track your subject right up until the moment of exposure.
  • One Push AF gives you an automatic assist during manual focusing. The button is easily accessible by your left thumb.
Sophisticated exposure control.

Because exposure is so important in image creation, Sony provides a comprehensive range of exposure modes, including Auto, four Scene Modes, Program Auto with Shift, Exposure Compensation, Shutter Priority, Aperture Priority and Manual.
  • Aperture adjusts in 16 steps from f2.8 to f16.0.
  • Shutter adjusts in 49 steps from 30 to 1/2000 seconds, not to mention Bulb Exposure for up to three minutes!
Choice of color modes.

One of the benefits of film photography is the ability to choose film emulsions. Because each type of film reacts to light differently, each offers a different color palette. In the same way, the DSC-R1 offers four different modes for color reproduction.
  • Adobe RGB represents a wide range of colors to support professional, four-color printing of magazines and brochures.
  • Standard sRGB is optimized for the most accurate reproduction on computer monitors and computer printers.
  • Vivid sRGB reproduces more intense primary colors, similar to a good reversal film.
  • RAW format brings the latent image into the digital darkroom. You can exercise exquisite control over RAW images without destroying the original data, using Sony's supplied Image Data Converter SR software. The software also converts RAW images into TIFF and JPEG files.
White balance.

Your brain makes constant adjustments, enabling you to recognize a white object as white whether it's under moonlight, candlelight, daylight or incandescent light. Unlike your brain, digital cameras need the help of White Balance. For this reason, the DSC-R1 incorporates five white balance presets, manual white balance and white balance tuning from -3 to +3. And unlike D-SLRs, the R1 enables you to preview the effect of your adjustments in the LCD monitor and electronic viewfinder!

ISO sensitivity.

The image sensor of the DSC-R1 is more than twelve times the size of the typical digital camera sensor. So the R1 is far more sensitive to light, providing you far more flexibility in low-light conditions. For this reason, you can continue to shoot handheld in circumstances where previous cameras require external flash, tripod support, image stabilization or and/or very long exposures.

Sony enables you to put this sensitivity to work by dialing up the camera's ISO setting. Where previous Sony cameras went to a maximum ISO setting of 800, the DSC-R1 offers ISO settings of 160, 200, 400, 800, 1600 and a phenomenal 3200!

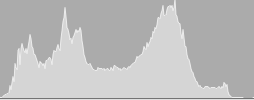
Information, please.

The DSC-R1 viewfinder and LCD monitor present a wealth of shooting information. Because the R1 image sensor has a wider 3:2 aspect ratio than the viewfinder or monitor, Sony can position a full-time exposure display at the bottom of these screens. You always see status for aperture, shutter, Exposure Value over/under, focus lock, exposure lock and flash.

Selectable Grid Lines can divide the frame vertically and horizontally into thirds, for easy "rule of thirds" shot composition. Selectable Zebra Stripes give you on-screen warning of overexposure. Histogram shows you the range of scene brightness levels while you shoot. And R/G/B Histograms analyze color during playback!

Basic specifications.

Download DSC-R1 Specifications Sheet 2.6 MB; Adobe Acrobat Reader Required

Pixels 10,784K pixels (Gross)10,286K pixels (Effective)
Imager APS-C class CMOS Sensor; 21.5 x 14.4 mm effective; RGB primary color filter
Processor Real Imaging Processor™ LSI with Advanced Gradation Control System (AGCS)
Color Reproduction Adobe RGB, sRGB, Vivid RGB Filter, Primary color filter Zoom, 5x Optical (Mechanical Manual), 10x Precision Digital Zoom, 15x Smart Zoom™ feature (1 MP)
Lens Carl Zeiss® Vario-Sonnar® T* lens; 12 elements in 10 groups (4 aspherical); Maximum magnification ratio x0.21; Linear AF motor; 67 mm filter diameter
Aperture F2.4-4.8 (minimum F16)
Focal Length 14.3 mm-71.5 mm (35mm equivalent: 24 mm-120 mm)
Shutter 1/2000 - 30 seconds; Bulb up to 3 minutes
Focusing Range AF = 20"-infinity (500 mm-infinity)
Macro AF WIDE: 13-3/4"-infinity (350 mm-infinity); TELE: 15-3/4"-infinity (400 mm-infinity)
Recording Media Memory Stick®/Memory Stick PRO™ media; CompactFlash™ Type I/ CompactFlash Type II / Microdrive™ media
LCD Monitor 2.0-inch TFT (134k pixels) Free Angle LCD (Upward 85°, Downward 20°, Right/Left 90°)
Electronic Viewfinder 0.44 inches (235k pixels); 100% coverage; Eye sensor
USB USB 2.0 Hi-speed
Weight 2 lbs., 5 oz. (1047 g) including battery and Memory Stick media

Main features.


Photo Modes Auto, P Auto, Scene Mode (Twilight, Twilight Portrait, Portrait, Landscape)
Still Image Size JPEG: 10M (3,888 x 2,592); 7M (3,264 x 2,176); 5M (2,592x1,944); 3M (2,048x1,536); 1M (1,280x960); RAW
Response Startup: 0.68 sec (in Preview Mode); Burst: 3.0 fps, 3 shots; Shutter Interval: 1 sec.; Shutter Lag: 0.29 sec. (including AF/AE); Release Lag: 0.0075 sec.
Manual Focus Yes
AF Area Multi Point AF (5 points), Center Weighted Spot, Flexible Spot AF
AF Method Single AF, Monitoring AF, Continuous AF, One Push AF
AF Illuminator Yes
Light Metering Multi Pattern, Center Weighted, Spot

Flash Mode Auto, Forced Flash, No Flash, Slow Synchro, Rear Syncro
Built-in Flash Guide Number 12
Flash Effective
Range
WIDE 1'8"-12'10" (0.5-3.9 m); TELE: 1'8"-7'10" (0.5-2.4 m)
ISO Sensitivity Auto/160/200/400/800/1600/3200
White Balance Auto, Daylight, Cloudy, Fluorescent, Incandescent, Flash, Manual (White Balance Tuning: -3 ~ +3, by step)
Histogram Yes (RGB Histogram in playback)
Battery Stamina CIPA standard: approx. 500 pictures with supplied NP-FM50 InfoLithium® battery

Supplied accessories.

  • NP-FM50 InfoLithium Battery
  • AC-L15 AC Adapter with in-camera charger
  • Video Cable
  • USB Cable
  • Sony PicturePackage software
  • Sony Image Data Converter SR software
  • Shoulder Strap
  • Lens cap with strap
  • Lens hood
NOTE: No Memory Stick media or adapters are included.


Optional accessories.

  • NP-FM50 spare InfoLithium® battery
  • HVL-RLA, HVL-F32X, HVL-F1000 flashes
  • STP-SA neck strap
  • LCS-CSE, LCJ-RA, LCS-RA, LCH-RA carrying cases
  • VCT-D680RM, VCT-1500L tripods
  • RM-VD1, RM-DR1 remote controls
  • VAD-RA conversion lens adaptor
  • VCL-DEH17R tele conversion lens
  • VCL-DEH08R wide angle conversion lens
  • VCL-M3367 close-up adapter
  • VF-67CP polarization filter
  • VF-67ND neutral density filter
  • VF-67MP protection filter
  • MHS-128, MSX-256S, 256N, 512S, 512N, 1GS, 1GN, 2GN,
    4GN Memory Stick® media
  • MSAC-PC4, USM1, US30 Memory Stick adapters

Wednesday 6 June, 2007

Sony Cyber-shot DSC-H9

Courtesy: http://www.dpreview.com/reviews/sonyh9/

Cyber-shot DSC-H9 vs DSC-H5 - key changes
  • New sensor (8MP versus 7MP)
  • longer lens range (15x up from 12x)
  • Higher maximum sensitivity (ISO 3200)
  • Tilt-up articulated screen
  • Lithium Ion battery
  • Control dial has moved to rear of camera
  • 9-point AF (was 3-point)
  • New Sports mode
  • HDTV (1080i) video output (via optional component cable)
  • Face detection
  • D-Range optimization (auto contrast)
  • In-camera retouching
  • Remote control included
  • NightShot function for shooting in the dark
  • Entirely new user interface
Sensor

• 1/2.5 " Type CCD
• 8.1 million effective pixels

Lens

• Carl Zeiss Vario-Tessar
• 31-465mm (35mm equiv)
• 15x optical zoom
• F2.7-4.5

Maximum Image Size 3264 x 2448

Sensitivity

• Auto
• ISO 80-3200

Top shutter speed 1/4000th

Autofocus modes

• 9 Area Multi-Point AF
• Center AF
• Flexible spot AF

Scene modes

• Twilight • Twilight Portrait • Portrait • Landscape • Beach • Snow • Fireworks • High Sensitivity • Advanced Sports Shooting

Continuous Shooting 100 shots, 2.2fps, 8MP (max)

Flash range, Auto ISO Up to 9.8m (wide)

LCD screen

• 3.0-inch tilt-up TFT
• 230,000 pixels

Power

• Lithium-ion NP-BG1 battery

Battery life (CIPA standard, using LCD) 280

Weight (inc batteries) 546g

Remote control Included

Other

• NightShot infrared system
• Face Detection
• HDTV output (optional cable)
• Bionz processing engine
• In-camera effects

DSC-H9 specifications

Street price • US: $480
• UK: £320
Body Material Plastic
Sensor

• 1/2.5 " Type CCD
• 8.1 million effective pixels

Image sizes

• 3264 x 2448
• 2592 x 1944
• 2048 x 1536
• 640 x 480
• 3264 x 2176 (3:2)
• 1920 x 1080 (16:9)

Movie clips

• MPEG VX Fine / Standard
(640 x 480 @ 30 / 16 fps MPEG-1 with audio)

File formats • Still: JPEG
• Movie: MPEG VX (MPEG-1)
Lens

• Carl Zeiss Vario-Tessar
• 31-465mm (35mm equiv)
• 15x optical zoom
• F2.7-4.5

Image stabilization Super SteadyShot®
Conversion lenses Yes
Digital zoom • 2x (24x total)
• Up to 30x Smart Zoom (dependent on selected resolution)
Focus • Auto
• Macro
• Single
• Monitoring
AF area modes • 9 Area Multi-Point AF
• Center AF
• Flexible spot AF
• Contrast detect
AF assist lamp Yes
Focus distance • Normal: 50cm (19.7 in) minimum (W), 120cm (47.25 in) minimum (T)
• Macro: 1cm (0.4 in) wide only
Metering • Multi-pattern (49 zone)
• Center weighted
• Spot
ISO sensitivity • Auto
• ISO 80
• ISO 100
• ISO 200
• ISO 400
• ISO 800
• ISO 1600
• ISO 3200
Exposure compensation • +/-2EV
• 1/3 EV steps
Exposure bracketing +/- 0.3, 0.7, 1.0 EV
Shutter speed

• Auto: 1/4-1/4000sec
• P: 1"-1/4000sec
• S: 30"-1/4000sec
• A: 8"-1/2000sec
• M: 30"-1/4000sec

Aperture F2.7-5.6 (w) F4.5-8 (t)
Modes

• Program
• Aperture priority
• Shutter priority
• Manual
• 9-preset select scene modes

Scene modes • Twilight
• Twilight Portrait
• Portrait
• Landscape
• Beach
• Snow
• Fireworks
• High Sensitivity
• Advanced Sports Shooting
White balance

• Auto
• Daylight
• Cloudy
• Fluorescent 1, 2, 3
• Incandescent
• Flash WB
• Manual

Self timer • 10 or 2 secs
Continuous shooting 100 shots, 2.2fps, 8MP (max)
Image parameters Natural, Vivid, Sepia, B&W, Sharpness, Contrast
Flash

• Auto
• On
• Slow Synch
• Off
• Red-eye reduction
• Front/rear synch
• Auto/Daylight synch
• Range: 0.2 - 9.8m (wide) 1.2 - 6m (tele)

Viewfinder • 0.2" EVF
• 201K pixels
LCD monitor • 3.0-inch tilting TFT
• 230K pixels
Connectivity • USB 2.0 high speed
• HD
• AV w/multi-jack
• DC in
Print compliance PictBridge, DPOF
Storage • Memory Stick Duo / Pro Duo compatible
• 31MB internal memory
Power • Lithium-ion NP-BG1 battery
• BC-CSG Charger
Weight (inc batt) 554 g (1 lb 4.3 oz)
Dimensions 113.2 x 83 x 94 mm (4.6 x 3.3 x 3.7 in)