Bokeh (derived from Japanese, a noun boke 暈け, meaning "blurred or fuzzy") is a photographic term referring to the appearance of point of light sources in an out-of-focus area of an image produced by a camera lens using a shallow depth of field. Different lens bokeh produces different aesthetic qualities in out-of-focus backgrounds, which are often used to reduce distractions and emphasize the primary subject.
Origin
Mike Johnston, former editor of Photo Techniques magazine, claims to have coined the bokeh spelling to suggest the correct pronunciation to English speakers, replacing the previous spelling boke that derived directly from the Japanese word for "fuzzy" and had been in use at least since 1996. It can be pronounced /ˈboʊke/ or /ˈboʊkə/ (boke-aay or boke-uh).
The term bokeh has appeared in photography books at least since 2000.
For more detailed information visit Wikipedia
Showing posts with label Photography Tips. Show all posts
Showing posts with label Photography Tips. Show all posts
Tuesday, 21 April 2009

Wednesday, 7 May 2008
Aquarium Photography
Aquariums are a popular vacation attraction for families and photographers. Unfortunately, it is also one of the attractions responsible for the most failed photographs. Aquariums are deceptively difficult areas to photograph inside. However, with a bit of knowledge and some practice, your photos of your next aquarium visit can be great!
Difficulties
Aquariums are difficult locations because of several issues.
Water
The water surrounding your intended subject may be crystal clear to your eyes but there is still particulate matter floating in it. Also, water has a large light-bending effect and every inch you shoot through makes it more difficult for your camera to collect enough light.
Glass/Plexiglass
When photographing fish on exhibit at an aquarium you are shooting through glass or plexiglass type material that is, at times, a full foot in thickness.While this is easy for your eye to see through, the light bending properties can make it difficult for your camera to focus properly. Also, flash reflects off of glass and leaves a nasty glare on images.
Lighting
When you walk into an aquarium the displays all look incredibly bright to our eyes. That is because you are standing in a dimly lit room and your eyes have dilated. The exhibits themselves are not as bright as they appear to you. Also, your eyes are continuously recording light. Your camera only has a fraction of a second to collect enough light. This makes the lighting levels of the aquarium displays harder to photograph.
Overcoming Shooting Difficulties
In order to take great shots at an aquarium you must learn to overcome the innate challenges of the location. To do this we must look at each challenge individually because each challenge affects the image to different degrees at different displays.
Water
To overcome the challenge of water is to pay attention to timing and your subject's position. Plan to take photographs when the water is at it's clearest. Just before feeding time the fish are generally excited but the water is at its clearest and free of additional fish debris. During and after feeding the water is cloudy from food particles, extra air bubbles (created from frantic feeding), and fish waste. In addition to avoiding cloudy water, plan to photograph subjects relatively close to the glass. This will minimize the amount of light refraction from the water and particulate matter.
Glass/Plexiglass
It takes a lot of strength to hold back thousands of gallons of water and large sea creatures rubbing against the glass. In spite of the exceptionally high quality of this material, it does still scatter light to some degree. Be prepared to switch to manual focus (if your camera supports one) to make adjustments to your camera's autofocus if it has trouble locking on to your subject.Your on-camera flash is not usually helpful with glass/plexiglass either. Because the flash fires directly ahead of the camera the reflection obscures the subject you wished to capture. To avoid this glare you need to increase the angle of the flash to the glass in relation to your camera. If your camera does not have an add-on flash option you can turn your camera (and yourself) at a 45 degree or better angle to the glass before taking an image. This can mean shooting upwards at a fish or shooting from the side. There can be some distortion of your subject with shooting this way but it should help avoid flash glare. If your camera accepts an add-on flash via hot shoe mount you can use a flash with a tilt head. By tilting the head of the flash at least 45 degrees you will move the position of the glare away from your lens.
Lighting
Because exhibits often seem very bright to our dilated eyes, it can be confusing when your camera insists it does not have enough light. If you have a camera without shutter speed and aperture control you will need to rely on manipulation of your camera preset modes to make shooting adjustments.If your camera has the ability to control aperture and shutter speed your task will be much easier. When taking photographs in an aquarium you should use a small F-Stop setting (large aperture) to allow more light into the lens. Shutter speed will then be set based on exposure values as determined by your light meter (if you have one). Keep in mind that fish are almost always in constant motion and keeping your shutter speed about 1/60th of a second is a good idea. You will also need to set your film speed to a more sensitive number. ISO 800 is generally a minimum film speed for shooting without a flash while ISO 400 is probably ok with flash.You can also make the most of the light available in a scene by photographing fish near the tank light source. Often this light source is at the top of the tank so you have to be careful not to photography only the underside of the fish when shooting upwards.
By pulling together the techniques to compensation with water, glass/plexiglass, and lighting you can greatly improve your aquarium photographs.Also, when taking photographs in an aquarium, you must be mindful of proper photography etiquette. Most aquariums are very photography friendly (commercial photographers be sure to check for additional restrictions) but there are a few restrictions. Some marine species are very sensitive to light. Because of this, flash is not allowed at certain exhibits. Please take the time to look for "no flash" signs at an exhibit before starting your photography. Be respectful of other guests as well. Just because you REALLY want a great photo of a stingray does not give you the right to push anyone else out of the way or take the best viewing spot at an exhibit for an hour. If you really want a lot of camera freedom, consider an aquarium photo workshop offered by the aquarium. Some aquariums also limit the size/number of bags than can be brought into the facility and some ban tripods. Be sure to check ahead of time to find out whether or not you can bring your camera bag full of equipment with you. By following the rules of the aquarium you are visiting you will help to ensure that you (and other photographers) will continue to be allowed to photograph an amazing variety of fish without ever getting wet.
Difficulties
Aquariums are difficult locations because of several issues.
Water
The water surrounding your intended subject may be crystal clear to your eyes but there is still particulate matter floating in it. Also, water has a large light-bending effect and every inch you shoot through makes it more difficult for your camera to collect enough light.
Glass/Plexiglass
When photographing fish on exhibit at an aquarium you are shooting through glass or plexiglass type material that is, at times, a full foot in thickness.While this is easy for your eye to see through, the light bending properties can make it difficult for your camera to focus properly. Also, flash reflects off of glass and leaves a nasty glare on images.
Lighting
When you walk into an aquarium the displays all look incredibly bright to our eyes. That is because you are standing in a dimly lit room and your eyes have dilated. The exhibits themselves are not as bright as they appear to you. Also, your eyes are continuously recording light. Your camera only has a fraction of a second to collect enough light. This makes the lighting levels of the aquarium displays harder to photograph.
Overcoming Shooting Difficulties
In order to take great shots at an aquarium you must learn to overcome the innate challenges of the location. To do this we must look at each challenge individually because each challenge affects the image to different degrees at different displays.
Water
To overcome the challenge of water is to pay attention to timing and your subject's position. Plan to take photographs when the water is at it's clearest. Just before feeding time the fish are generally excited but the water is at its clearest and free of additional fish debris. During and after feeding the water is cloudy from food particles, extra air bubbles (created from frantic feeding), and fish waste. In addition to avoiding cloudy water, plan to photograph subjects relatively close to the glass. This will minimize the amount of light refraction from the water and particulate matter.
Glass/Plexiglass
It takes a lot of strength to hold back thousands of gallons of water and large sea creatures rubbing against the glass. In spite of the exceptionally high quality of this material, it does still scatter light to some degree. Be prepared to switch to manual focus (if your camera supports one) to make adjustments to your camera's autofocus if it has trouble locking on to your subject.Your on-camera flash is not usually helpful with glass/plexiglass either. Because the flash fires directly ahead of the camera the reflection obscures the subject you wished to capture. To avoid this glare you need to increase the angle of the flash to the glass in relation to your camera. If your camera does not have an add-on flash option you can turn your camera (and yourself) at a 45 degree or better angle to the glass before taking an image. This can mean shooting upwards at a fish or shooting from the side. There can be some distortion of your subject with shooting this way but it should help avoid flash glare. If your camera accepts an add-on flash via hot shoe mount you can use a flash with a tilt head. By tilting the head of the flash at least 45 degrees you will move the position of the glare away from your lens.
Lighting
Because exhibits often seem very bright to our dilated eyes, it can be confusing when your camera insists it does not have enough light. If you have a camera without shutter speed and aperture control you will need to rely on manipulation of your camera preset modes to make shooting adjustments.If your camera has the ability to control aperture and shutter speed your task will be much easier. When taking photographs in an aquarium you should use a small F-Stop setting (large aperture) to allow more light into the lens. Shutter speed will then be set based on exposure values as determined by your light meter (if you have one). Keep in mind that fish are almost always in constant motion and keeping your shutter speed about 1/60th of a second is a good idea. You will also need to set your film speed to a more sensitive number. ISO 800 is generally a minimum film speed for shooting without a flash while ISO 400 is probably ok with flash.You can also make the most of the light available in a scene by photographing fish near the tank light source. Often this light source is at the top of the tank so you have to be careful not to photography only the underside of the fish when shooting upwards.
By pulling together the techniques to compensation with water, glass/plexiglass, and lighting you can greatly improve your aquarium photographs.Also, when taking photographs in an aquarium, you must be mindful of proper photography etiquette. Most aquariums are very photography friendly (commercial photographers be sure to check for additional restrictions) but there are a few restrictions. Some marine species are very sensitive to light. Because of this, flash is not allowed at certain exhibits. Please take the time to look for "no flash" signs at an exhibit before starting your photography. Be respectful of other guests as well. Just because you REALLY want a great photo of a stingray does not give you the right to push anyone else out of the way or take the best viewing spot at an exhibit for an hour. If you really want a lot of camera freedom, consider an aquarium photo workshop offered by the aquarium. Some aquariums also limit the size/number of bags than can be brought into the facility and some ban tripods. Be sure to check ahead of time to find out whether or not you can bring your camera bag full of equipment with you. By following the rules of the aquarium you are visiting you will help to ensure that you (and other photographers) will continue to be allowed to photograph an amazing variety of fish without ever getting wet.
Thursday, 13 March 2008
Tips on taking product shots
Product shots are really important when it comes to selling an item over the Internet. This is especially so because many online retailers sell the same products. However, the problem is that many of them choose to use stock photos. But, when stock photos are used it does not give the consumer a good idea of the detail of the item for sale. As a result, product shots are really important and they may very well be the difference of selling an item and losing a customer.
Product shots are not that difficult to achieve, even if you have never taken any. You just need to understand the basics of a great product shot and you will be able to take them.
Quality
Using a digital camera to take product shots is important. However, you will need to use the highest resolution settings the camera has. You want to use a camera with high megapixels but with a minimum of three megapixels to ensure quality. So, you don’t need a top of the line digital camera. An average camera will do.
Lighting
You want to ensure your original photo is as good as possible so editing will make it better. If the photo has poor lighting or is overexposed then there is no saving it. A plain background with front lighting that is natural is usually the best way to get a good product shot. Choose a contrasting background to the product you are selling. The contrasting color will make the product sot pop.
Backgrounds
Use a plain background. The reason why plain backgrounds are important is because they are not distracting. You want the product shots to focus entirely on the product, not something in the background. When only the product is in the photo then buyers will only see that and focus on it, rather than something else. This is exactly what you want.
Details
Many times individuals choose to purchase an item in a brick and mortar store, even if it is more expensive, simply because they can see the product in detail. So, when it comes to product shots you will want to show as many details as possible. Close up bubbles are very helpful in this situation and will allow customers to check out the details without having to load multiple photos.
Coloration
Use Photoshop after you have your photo so you can enhance colors and make the photo pop. Focus on using real colors and just making them more vibrant rather than completely changing colors simply because you can.
Finishing Touches
You can really enhance your photos, especially if you are an amateur, with toolbars like brightness and contrast and auto levels. This makes the photos look better, which is what you are going for.
These are just some suggestions to help you take better product shots with a digital camera. If you use detailed product shots then you will see that you will have more customers and make more sales. Go ahead and give it a shot and you will see that it is not that difficult.
Realty about digital zoom
Digital Cameras can come in a variety of colors, shapes, and sizes. There are so many features it could make your head spin. When you are looking into your next purchase for a digital camera one of the most important things to look into is the camera’s zoom options. Today’s cameras are marketed with optical and digital zoom options. It is very important to know the difference between the two.
Optical Zoom
Quite simply the optical zoom feature uses the actual lens optics to bring your subject closer to you. This is your truest option, and it will leave you with the most information when it comes time for editing and printing.
Digital Zoom
The digital zoom feature uses software built inside the camera to enlarge or “crop-in” the subject to appear closer to you. This option loses digital pixels inside your image and can make pictures appear “fuzzy” or “pixely”.
Is one better than the other?
Absolutely! My recommendation is to only use the optical zoom. The digital zoom robs you of important digital information that could mean the difference between handing grandma a crisp 8×10 of the kids or a smaller 5×7 (She wants the 8×10, I promise). I live in
Just turn it off!
Most digital cameras allow you the option of turning off your camera’s digital zoom feature. I highly recommend that you do this. As always, all digital camera menus and functions are different with each make and model so consult your manual. If you can’t turn it off, set your digital camera to notify you when the zoom switches from optical to digital.
Professional Photographer’s Big Secret!!!!!
Use your feet to get closer to your subject. That’s it. Keep shooting and have fun.
Thursday, 12 July 2007
Using Water to Lighten Landscape Photos
Most Pro landscape photographers recommend shooting either at (or around) dawn or dusk in order to capture their scene in the ‘golden hours’ when the light is at it’s best (in fact some will rarely shoot at any other time of day).
Here are some sample photos:


Courtesy: Digital-Photography-School
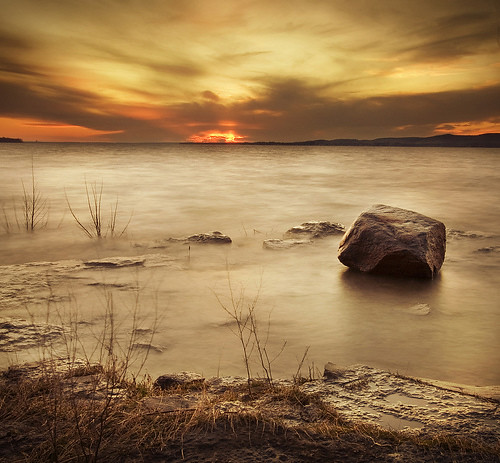
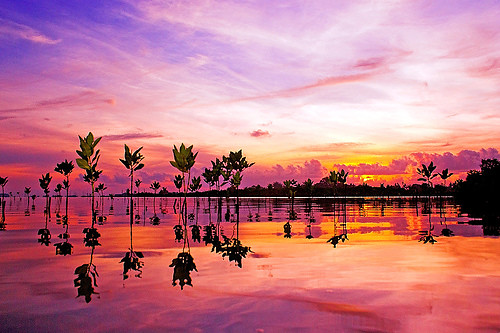
However, one of the problems associated with shooting at this time of day is that while the sky will often have enough light in it the foreground of your images can sometimes end up being a little underexposed and featureless.
One way to get around underexposed foregrounds is to include water in that area of your shot and to get it reflecting light from the sky.
This is a particularly effective technique at sunrise or sunset when there’s color and interesting cloud formations in the sky (and reflections in the water).
It may take a little experimentation with different positions to shoot from in order to get the right part of the sky in the reflections but with a little trial and error the effect can be quite stunning and a much brighter and more balanced image.
Even if you don’t get perfect reflections the light coming from the water can help balance the shot and help you overcome underexposed foregrounds.
Here are some sample photos:

Courtesy: Digital-Photography-School
Thursday, 5 July 2007
How to Photograph Fireworks Displays
How to Photograph Fireworks Displays
Do you want to know how to photograph fireworks? Below I’ll give you 10 tips to help you get started.
Fireworks Displays are something that evoke a lot of emotion in people as they are not only beautiful and spectacular to watch but they also are often used to celebrate momentous occasions.
I’ve had many emails from readers asking how to photograph fireworks displays, quite a few of whom have expressed concern that they might just be too hard to really photograph. My response is always the same - ‘give it a go - you might be surprised at what you end up with’.
My reason for this advice is that back when I bought my first ever SLR (a film one) one of the first things I photographed was fireworks and I was amazed by how easy it was and how spectacular the results were. I think it’s even easier with a digital camera as you can get immediate feedback as to whether the shots you’ve taken are good or not and then make adjustments.
Of course it’s not just a matter of going out finding a fireworks display - there are, as usual, things you can do to improve your results.1. Use a Tripod
Perhaps the most important tip is to secure your digital camera to something that will ensure it doesn’t move during the taking of your shots. This is especially important in photographing fireworks simply because you’ll be using longer shutter speeds which will not only capture the movement of the fireworks but any movement of the camera itself. The best way to keep your camera still is with a tripod. Alternatively - keep in mind that there are other non Tripod options for beating camera shake.
2. Remote Release
One way to ensure your camera is completely still during fireworks shots is to invest in a remote release device. These will vary from camera to camera but most have some sort of accessory made for them. The other way of taking shots without touching your camera is to use the self timer. This can work but you really need to be able to anticipate shots well and its very very hit and miss (read more on remote shutter releases).
3. Framing Your Shot
One of the most difficult parts of photographing fireworks is working out where to aim your camera. The challenge you’ll face in doing this is that you generally need to aim your camera before the fireworks that you’ll be photographing goes off - anticipation is key. Here are a few points on getting your framing right.
- Scope out the location early - Planning is important with fireworks and getting to the location early in order to get a good, unobstructed position is important. Think about what is in the foreground and background of your shots and make sure you won’t have people’s heads bobbing up into your shots (also consider what impact you’ll have on others around you also). Take note of where fireworks are being set up and what parts of the sky they are likely to be shot into - you might also want to try to ask some of those setting up the display for a little information on what they are planning. Also consider what focal lengths you might want to use and choose appropriate lenses at this time (rather than in the middle of the show).
- Watch your Horizons - One thing that you should always consider when lining up fireworks shots is whether your camera is even or straight in it’s framing. This is especially important if you’re going to shooting with a wide focal length and will get other background elements in your shots (ie a cityscape). Keeping horizons straight is something we covered previously on this site and is important in fireworks shots also. As you get your camera on your tripod make sure it’s level right from the time you set up.
- Vertical or Horizontal? - There are two main ways of framing shots in all types of photography, vertically (portrait) or horizontally (landscape). Both can work in fireworks photography but I personally find a vertical perspective is better - particularly as there is a lot of vertical motion in fireworks. Horizontal shots can work if you’re going for more of a landscape shot with a wider focal length of if you’re wanting to capture multiple bursts of fireworks in the one shot - but I don’t tend to go there that often.
- Remember your framing - I find that when I photograph fireworks that I spend less time looking in my viewfinder and more looking at the sky directly. As a result it’s important to remember what framing you have and to watch that segment of the sky. Doing this will also help you to anticipate the right time for a shot as you’ll see the light trails of unexploded rockets shooting into the sky.
One of the hardest parts of photographing fireworks is having your camera trained on the right part of the sky at the right time. This is especially difficult if you’re shooting with a longer focal length and are trying to take more tightly cropped shots. I generally shoot at a wider focal length than a tight one but during a show will try a few tighter shots (I usually use a zoom lens to give me this option) to see if I can get lucky with them. Of course zoomed in shots like the one to the left can be quite effective also. They enable you to really fill the frame with great color. Keep in mind however that cropping of your wider angle fireworks shots can always be done later to get a similar impact in your photography.
5. Aperture
A common question around photographing fireworks displays is what aperture to use. Many people think you need a fast lens to get them but in reality it’s quite the opposite as the light that the fireworks emit is quite bright. I find that apertures in the mid to small range tend to work reasonably well and would usually shoot somewhere between f/8 to f/16.
Probably more important to get right than aperture is shutter speed. Fireworks move and as a result the best photographs of them capture this movement meaning you need a nice long exposure. The technique that I developed when I first photographed fireworks was to shoot in ‘bulb’ mode. This is a mode that allows you to keep the shutter open for as long as you hold down the shutter (preferably using a remote shutter release of some type). Using this technique you hit the shutter as the firework is about to explode and hold it down until it’s finished exploding (generally a few seconds).
You can also experiment with set shutter speeds to see what impact it will have but I find that unless you’re holding the shutter open for very long exposures that the bulb technique works pretty well.
Don’t keep your shutter open too long. The temptation is to think that because it’s dark that you can leave it open as long as you like. The problem with this is that fireworks are bright and it doesn’t take too much to over expose them, especially if your shutter is open for multiple bursts in the one area of the sky. By all means experiment with multiple burst shots - but most people end up finding that the simpler one burst shots can be best.
7. ISOShooting at a low ISO is preferable to ensure the cleanest shots possible. Stick to ISO 100 and you should be fine.
8. Switch off your Flash
Shooting with a flash will have no impact upon your shots except to trick your camera into thinking it needs a short exposure time. Keep in mind that your camera’s flash will only have a reach of a few meters and in the case of fireworks even if they were this close a flash wouldn’t really have anything to light except for some smoke which would distract from the real action (the flashing lights).Switch your flash off.
9. Shoot in Manual Mode
I find I get the best results when shooting in manual exposure and manual focus modes. Auto focusing in low light can be very difficult for many cameras and you’ll end up missing a lot of shots. Once your focusing is set you’ll find you don’t really need to change it during the fireworks display - especially if you’re using a small aperture which increases depth of field. Keep in mind that changing focal lengths will mean you need to need to adjust your focusing on most lenses.
10. Experiment and Track Results
Throughout the fireworks display periodically check your results. I generally will take a few shots at the start and do a quick check to see that they are OK before shooting any more. Don’t check after every shot once you’ve got things set up OK (or you’ll miss the action) but do monitor yours shots occasionally to ensure you’re not taking a completely bad batch.
Also experiment with taking shots that include a wider perspective, silhouettes and people around you watching the display. Having your camera pointed at the sky can get you some wonderful shots but sometimes if you look for different perspectives you can get a few shots that are a little less cliche and just as spectacular. Most of the best shots that I’ve seen in the researching of this article have included some other element than the fireworks themselves - whether it be people, buildings, landmarks or wider cityscape perspectives.
- “Find Out the Direction of the Wind - You want to shoot up wind, so it goes Camera, Fireworks, Smoke. Otherwise they’ll come out REALLY hazy.”
- “Also, I find that if you shoot from a little further back and with a little more lens, you can set the lens to manual focus, focus it at infinity and not have to worry about it after that.”
- “Remember to take advantage of a zero processing costs and take as many pictures as possible (more than you’d normally think necessary). That way, you’ll up your chances of getting that “perfect” shot.”
- “Make sure you are ready to take pictures of the first fireworks. If there isn’t much wind, you are going to end up with a lot of smoke in your shot. The first explosions are usually the sharpest one.”
- “Get some black foam core and set your camera to bulb. Start the exposure when the fireworks start with the piece of foam core in front of the lens. Every time a burst happens move the foam core out of the way. You will get multiple firework bursts in one exposure”
- “Another tip I would add to this is pre-focus if possible (need to be able to manually focus or lock down focus for good) before the show starts so other elements in the frame are sharp They did mention that you only need to focus once but its a lot easier to take a few shots before the show starts and check them carefully rather than wait until the show has begun and you are fiddling with focus instead of watching fireworks!”
What are histograms in Digital Cameras
“I was flicking through my camera’s menu today and came across a little graph labeled ‘histogram’. What is it and should I take any notice of it? Is there such a thing as the ideal histogram? What should we be aiming for?” - Brent


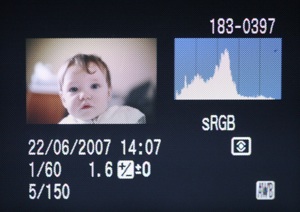
The above shot has a lot of light tones - in fact there are parts of the shot that are quite blown out. As a result on the right hand side of the histogram you can see a sudden rise. While there are quite a few mid tones - everything is skewed right and with the extreme values on the right hand side indicate an over exposed shot.


This second shot has a lot of dark tones. This is partly because of the black and navy clothes in the shot - but also because it’s slightly underexposed shot. The resulting histogram is quite different to the first one - the values are skewed to the left hand side.


You can see in this shot a much more even spread of tones. It’s still not perfect and I’d do a little post production work but it’s a much more evenly exposed shot and the histogram reflects this.
The whole tutorial and illustrations has been copied from here.
What is a Histogram
Histograms are a topic that we could (and probably should) spend a lot of time talking about but let me give you a very brief answer to get you through in the short term.
Histograms are a very useful tool that many cameras offer their users to help them get a quick summary of the tonal range present in any given image.
It graphs the tones in your image from black (on the left) to white (on the right).
The higher the graph at any given point the more pixels of that tone that are present in an image.
So a histogram with lots of dark pixels will be skewed to the left and one with lots of lighter tones will be skewed to the right.
The beauty of a histogram is that the small LCD display on your camera is not really big enough to give you an great review of a picture and you can often get home to find that you’ve over or under exposed an image. Checking the histogram can tell you this while you’re in a position to be able to adjust your settings and take another shot.
Some Examples of Histograms
Let’s look at a couple of examples of histograms on shots:
Compare these two shots and their corresponding histograms:


The above shot has a lot of light tones - in fact there are parts of the shot that are quite blown out. As a result on the right hand side of the histogram you can see a sudden rise. While there are quite a few mid tones - everything is skewed right and with the extreme values on the right hand side indicate an over exposed shot.


This second shot has a lot of dark tones. This is partly because of the black and navy clothes in the shot - but also because it’s slightly underexposed shot. The resulting histogram is quite different to the first one - the values are skewed to the left hand side.
Is there such a thing as a ‘good’ histogram?
As with most aspects of photography, beauty is the in eye of the beholder and there’s always a lot of room for personal taste and different ways of expressing yourself as a photographer.
There is no such thing as the ‘perfect’ histogram - different subjects and photographic styles will produce different results. For example taking a silhouette shot might produce a histogram with peaks at both ends of the spectrum and nothing much in the middle of the graph. Taking a shot of someone at the snow will obviously have a histogram with significant peaks on the right hand side…. etc
Having said this (and to generalize) - in most cases you’ll probably want a fairly balanced shot with a nice spread of tones. Most well exposed shots tend to peak somewhere in the middle and taper off towards the edges.
Using Histograms While Shooting
So now you know what a histogram is - grab your digital camera’s manual and work out how to switch it on in playback mode. This will enable you to see both the picture and the histogram when reviewing shots after taking them.
Keep an eye out for histograms with dramatic spikes to the extreme ends of either side of the spectrum. This indicates that you have a lot of pixels that are either pure black or pure white. While this might be what you’re after remember that those sections of the image probably have very little detail - this is a hint that your image could be either over or under exposed.
The histogram is really just a tool to give you more information about an image and to help you get the effect that you want. Having your camera set to show you histograms during the view process will tell you how your image is exposed. Learning to read them will help you to work out whether you’re exposing a shot as you had hoped.
Another Example of a Histogram
Lets finish this tutorial by looking at one last example of a histogram:
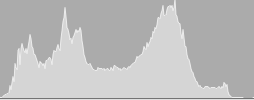
You can see in this shot a much more even spread of tones. It’s still not perfect and I’d do a little post production work but it’s a much more evenly exposed shot and the histogram reflects this.
The whole tutorial and illustrations has been copied from here.
Subscribe to:
Posts (Atom)
Visits to the page
